Ground Plane Editor
TAD creates 3D by extruding shapes linearly. Quite often, when you begin using TAD and when you want to get into TAD you may find that it extrudes only from the ground up.
But the truth is: TAD can actually extrude in any direction The Ground Plane Editor allows you to select the plane from which the extrusion has to happen.
The actual ground (which coincides with our regular definition of the word “ground”) is referred in this documentation as the true ground
To understand the Ground Plane editor; you need to visualize what is happening in your TAD model and then ask yourself if you have the answers to the following questions
1. Can you notice the vertical plane that is formed on the edge where the two helpers are?
2. Can you decide in which direction would the extrusion happen? Into the object where the helpers are? or away from it?
3. Now that you have understood the above two; can you now locate yourself standing in front of that vertical plane, and look at the extrusion coming towards you? (You dont have to shift anything when understanding this point. Just think a bit for yourself)
Now that you have understood, you can easily tell whether it was the first helper which is on the left bottom corner of that plane you are looking at; or was it the second helper
Once you have the above understanding; you can easily create a new Ground plane. Give a name for it and click on “Ad” (it means Add the ground plane) The first time you create a ground plane; it will create a pseudo object with the name of the Ground Plane, and now you have it like a sheet on the ground.
If you gather some classes into that ground plane; you will see the objects in those classes will be now extruded from the new Ground Plane definition you gave. Those objects will no longer be extruded from the actual physical ground of the site
Temple Construction in India
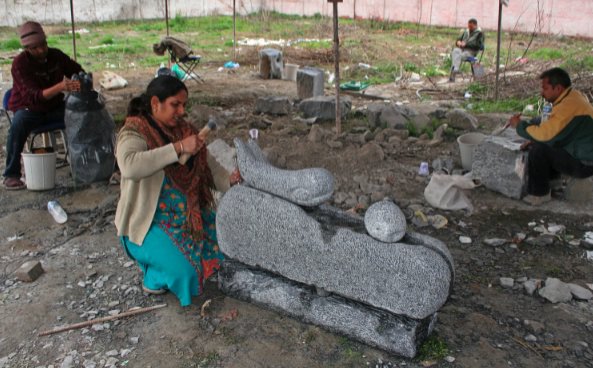
This process of pinning is what one sees in temple constructions all over India. The main temple is “extruded” or grown from the physical ground. But the elements placed on the vertical walls are NOT constructed directly in location. Say a sunshade that is projecting out 90 degrees proudly from a vertical face.
Instead, that part is first extruded on the actual ground somewhere else on the temple premises. Then the sculptor would work on it; and once that sunshade is fully finished; it is lifted up, rotated 90 degree vertically; and then pinned at the correct location on the final vertical face
The pinning concept in TAD is extremely powerful – as you can easily extrude any number of elements all over the site TAD does not need additional “windows” or “viewports” to see different parts of the same model. Instead, you can scatter all the 3D elements around the site very much in a similar fashion to the way temples were constructed in India once upon a time
BTW, Even today; temple construction happens in India in a similar fashion: It is fascinating to see sculptors creating various elements of the temple first on the ground – they are scattered randomly everywhere on the construction site – and then once finished, the elements are rotated 90 degrees vertically and pinned at the correct locations
If you were to load some of the TAD samples that were installed; such as Peter Uncle's Bungalow – you will noticed such pinned elements scattered in the site around the main bungalow

Original image from https://www.frontlineclub.com/indian_sculptors_bring_life_to_kashmir_stone-2/
Here are the steps to be done for pinning
Feeling lost? Start here or Start learning TAD using tutorials.